프래그먼트에서 구글맵 구현하고 내 위치 표시하기

이번 포스팅에서는 프래그먼트에서 구글맵을 구현하는 방법에 대해 알아보도록 하겠습니다.

# 구글 맵 구현법

안드로이드에서 구글맵을 구현하는 법은 두가지가 있는데요, 우선은 액티비티에서 OnMapReadyCallback을 구현하고 SupportMapFragment를 통해 다음과 같이 화면에 표시하는 방법이 있습니다.

1
2
3
4
<fragment
   class="com.google.android.gms.maps.SupportMapFragment"
   android:layout_width="match_parent"
   android:layout_height="match_parent"/>

두번째는 독립된 프래그먼트에서 OnMapReadyCallback을 구현한 뒤 MapView 컴포넌트에 표시하는 방법이 있습니다.

1
2
3
4
<com.google.android.gms.maps.MapView
    android:id="@+id/mapview"
    android:layout_width="match_parent"
    android:layout_height="match_parent" />

액티비티로 구글맵을 구현하는 방법은 구글 디벨로퍼 사이트에서 자세하게 설명하고 있기 때문에, 여기서는 독립된 프래그먼트를 만들어 구글맵을 구현하는 방법을 알아보도록 하겠습니다.

# Bottom navigation 구현

프래그먼트에 맵을 표시하기 위해 Bottom navigation을 구성해 주겠습니다. 우선은 액티비티 레이아웃에 Bottom navigation 컴포넌트와 프래그먼트를 표시할 FrameLayout을 추가해 줍니다.

 1
 2
 3
 4
 5
 6
 7
 8
 9
10
11
12
13
14
15
16
17
<FrameLayout
    android:layout_width="0dp"
    android:layout_height="0dp"
    android:id="@+id/frame_layout"
    app:layout_constraintBottom_toTopOf="@+id/bottom_navigation"
    app:layout_constraintEnd_toEndOf="parent"
    app:layout_constraintStart_toStartOf="parent"
    app:layout_constraintTop_toTopOf="parent" />

<com.google.android.material.bottomnavigation.BottomNavigationView
    android:id="@+id/bottom_navigation"
    android:layout_width="0dp"
    android:layout_height="56dp"
    app:layout_constraintBottom_toBottomOf="parent"
    app:layout_constraintLeft_toLeftOf="parent"
    app:layout_constraintRight_toRightOf="parent"
    app:menu="@menu/bottom_navigation_menu" />

그리고 res > menu 폴더를 만들어 컴포넌트에 표시할 메뉴파일을 작성합니다. 항목은 텍스트뷰를 하나 보여주는 InfoFragment와 맵을 표시하는 MapFragment 두개만 만들겠습니다.

 1
 2
 3
 4
 5
 6
 7
 8
 9
10
11
12
13
<menu xmlns:android="http://schemas.android.com/apk/res/android">

    <item
        android:id="@+id/navigation_info"
        android:icon="@drawable/ic_baseline_info_24"
        android:title="Info" />

    <item
        android:id="@+id/navigation_map"
        android:icon="@drawable/ic_baseline_map_24"
        android:title="Map" />

</menu>

InfoFragmentMapFragment는 다음과 같이 기본 View Binding 구성에 텍스트뷰 하나만 표시하도록 하겠습니다. 프래그먼트에서 View Binding을 사용하는 방법에 대해서는 findViewById 대신 View Binding 사용하기를 참조하시기 바랍니다.

 1
 2
 3
 4
 5
 6
 7
 8
 9
10
11
12
13
14
15
16
17
18
19
20
21
22
23
class InfoFragment : Fragment() {
    private var _binding: FragmentInfoBinding? = null
    private val binding get() = _binding!!

    override fun onCreateView(
        inflater: LayoutInflater,
        container: ViewGroup?,
        savedInstanceState: Bundle?
    ): View? {
        _binding = FragmentInfoBinding.inflate(inflater, container, false)
        return binding.root
    }

    override fun onViewCreated(view: View, savedInstanceState: Bundle?) {
        super.onViewCreated(view, savedInstanceState)
        binding.tvText.text = "Info Fragment"
    }

    override fun onDestroyView() {
        _binding = null
        super.onDestroyView()
    }
}

그리고 네비게이션 클릭시 동작을 구현하는 setupBottomNavigationBar 함수를 만들어서 메인액티비티의 onCreate에서 실행시킵니다.

 1
 2
 3
 4
 5
 6
 7
 8
 9
10
11
12
13
14
15
16
17
18
19
20
private fun setupBottomNavigation() {
    binding.bottomNavigation.setOnItemSelectedListener { item ->
        when(item.itemId) {
            R.id.navigation_info -> {
                supportFragmentManager.beginTransaction()
                    .replace(R.id.frame_layout, InfoFragment())
                    .commit()
                true
            }
            R.id.navigation_map -> {
                supportFragmentManager.beginTransaction()
                    .replace(R.id.frame_layout, MapFragment())
                    .commit()
                true
            }
            else -> false
        }
    }
    binding.bottomNavigation.selectedItemId = R.id.navigation_info
}

# 구글맵 API 키 설정

구글맵을 사용하기 위해서는 구글 클라우드에서 API 키를 취득해야 합니다. Google Cloud Console에서 설정 페이지를 참조하여 구글 클라우드에 새 프로젝트를 작성하고 API 사용설정을 해 줍니다. 그리고 API 키 만들기 페이지를 참조해서 만들어진 API 키를 확인합니다. 웹페이지의 설명이 어려우시면 Google 지도 플랫폼에서 API 키를 생성하고 제한하기 영상을 참고하세요.

API 키가 얻어졌으면 AndroidManifest.xml에 다음과 같이 키를 추가합니다.

1
2
3
<meta-data
    android:name="com.google.android.geo.API_KEY"
    android:value="API KEY" />

# Dependency 추가

이제 맵을 구현하는 MapFragment를 작성하겠습니다. 우선은 build.gradle 에 구글맵과 디바이스의 위치를 사용하기 위한 dependency를 추가합니다.

1
2
3
// Google maps
implementation 'com.google.android.gms:play-services-maps:18.0.2'
implementation 'com.google.android.gms:play-services-location:19.0.1'

# 레이아웃 구성

이제 프래그먼트 레이아웃에 지도를 표시할 MapView를 추가합니다.

 1
 2
 3
 4
 5
 6
 7
 8
 9
10
11
12
13
14
15
16
17
<?xml version="1.0" encoding="utf-8"?>
<androidx.constraintlayout.widget.ConstraintLayout xmlns:android="http://schemas.android.com/apk/res/android"
    xmlns:app="http://schemas.android.com/apk/res-auto"
    xmlns:tools="http://schemas.android.com/tools"
    android:layout_width="match_parent"
    android:layout_height="match_parent" >
  
    <com.google.android.gms.maps.MapView
        android:id="@+id/mapView"
        android:layout_width="0dp"
        android:layout_height="0dp"
        app:layout_constraintBottom_toBottomOf="parent"
        app:layout_constraintEnd_toEndOf="parent"
        app:layout_constraintStart_toStartOf="parent"
        app:layout_constraintTop_toTopOf="parent" />
    
</androidx.constraintlayout.widget.ConstraintLayout>

# MapFragment 작성

프래그먼트 클래스는 액티비티에서 구현할 때처럼 OnMapReadyCallback 을 구현하게 합니다. 우선은 onViewCreated에서 getMapAsync를 이용해 MapView를 초기화합니다. 그리고 OnMapReady에서 나머지 처리를 수행하면 됩니다. 여기서는 맵이 시작되면 카메라의 초기위치로 서울시청을 보여주도록 하였습니다. 그리고 onSaveInstanceState 설정을 하여 맵이 위치를 기억할 수 있도록 합니다.

 1
 2
 3
 4
 5
 6
 7
 8
 9
10
11
12
13
14
15
16
17
18
19
20
21
22
23
24
25
26
27
28
29
30
31
32
33
34
35
36
37
38
39
40
41
42
43
44
45
class MapFragment : Fragment(), OnMapReadyCallback {
    private var _binding: FragmentMapBinding? = null
    private val binding get() = _binding!!

+    private lateinit var map: GoogleMap

    override fun onCreateView(
        inflater: LayoutInflater,
        container: ViewGroup?,
        savedInstanceState: Bundle?
    ): View? {
        _binding = FragmentMapBinding.inflate(inflater, container, false)
        return binding.root
    }

    override fun onViewCreated(view: View, savedInstanceState: Bundle?) {
        super.onViewCreated(view, savedInstanceState)
+        binding.mapView.onCreate(savedInstanceState)
+        binding.mapView.getMapAsync(this)
    }

+    override fun onMapReady(googleMap: GoogleMap) {
+        map = googleMap
+
+        val initialPosition = LatLng(37.5638698,126.9791104)
+        val cameraUpdate = CameraUpdateFactory.newLatLngZoom(initialPosition, 14f)
+        map.animateCamera(cameraUpdate)
+
+        map.addMarker(
+            MarkerOptions()
+                .position(initialPosition)
+                .title("서울시청")
+        )
+    }

+    override fun onSaveInstanceState(outState: Bundle) {
+        super.onSaveInstanceState(outState)
+        binding.mapView.onSaveInstanceState(outState)
+    }

    override fun onDestroyView() {
        _binding = null
        super.onDestroyView()
    }
}

# 위치권한 획득하기

맵에 나의 위치를 표시하기 위해서는 위치권한이 필요합니다. Android 6.0(API 레벨 23) 이상에서는 위치권한 등의 위험한 권한들이 필요할 경우 앱이 실행중에 권한을 요청할 수 있도록 시스템이 변경되었습니다.

우선은 AndroidManifest.xml에서 앱에 필요한 권한을 정의합니다. 맵 데이터를 인터넷에서 받아오기 위한 INTERNET권한과, 위치정보를 가져오기 위한 LOCATION 권한이 필요합니다.

1
2
3
<uses-permission android:name="android.permission.INTERNET" />
<uses-permission android:name="android.permission.ACCESS_COARSE_LOCATION" />
<uses-permission android:name="android.permission.ACCESS_FINE_LOCATION" />

LOCATION 관련 권한이 2개이므로 한번에 요청하도록 하겠습니다. 요청할 모든 권한을 REQUIRED_PERMISSIONS에서 배열형태로 준비합니다. 그리고 checkSelfPermission을 이용해 현재 앱이 REQUIRED_PERMISSIONS에서 정의한 모든 권한을 가지고 있는지 순회하면서 체크하고 만약 false가 반환되었다면 requestMultiplePermissions를 실행해 권한을 획득하도록 합니다. 권한 요청은 맵 프래그먼트가 시작되기 전에 이루어져야하기 때문에 메인액티비티에서 수행하도록 하겠습니다. 권한 요청에 대한 더 구체적인 설명은 Runtime Permission 이해하고 요청 구현하기를 참고하시기 바랍니다.

 1
 2
 3
 4
 5
 6
 7
 8
 9
10
11
12
13
14
15
16
17
18
19
20
21
22
23
24
25
26
27
28
29
30
31
32
33
34
35
36
37
38
companion object {
    private val REQUIRED_PERMISSIONS = arrayOf(
        Manifest.permission.ACCESS_COARSE_LOCATION,
        Manifest.permission.ACCESS_FINE_LOCATION, 
    )
}

override fun onCreate(savedInstanceState: Bundle?) {
    super.onCreate(savedInstanceState)
    setContentView(binding.root)

    setBottomNavigation()

    if (!isAllPermissionsGranted()) {
        requestPermissionLauncher.launch(REQUIRED_PERMISSIONS)
    }
}

private fun isAllPermissionsGranted(): Boolean = REQUIRED_PERMISSIONS.all { permission ->
    ContextCompat.checkSelfPermission(this, permission) ==
            PackageManager.PERMISSION_GRANTED
}

private val requestPermissionLauncher =
    registerForActivityResult(ActivityResultContracts.RequestMultiplePermissions()) { permissions ->
        permissions.entries.forEach { permission ->
            when {
                permission.value -> {
                    Snackbar.make(binding.root, "Permission granted", Snackbar.LENGTH_SHORT).show()
                }
                shouldShowRequestPermissionRationale(permission.key) -> {
                    Snackbar.make(binding.root,
                        "Permission required to use app!", Snackbar.LENGTH_SHORT).show()
                }
                else -> Snackbar.make(binding.root, "Permission denied", Snackbar.LENGTH_SHORT).show()
            }
        }
    }

# 맵에 내 위치 표시하기

# getUiSetting 이용하기

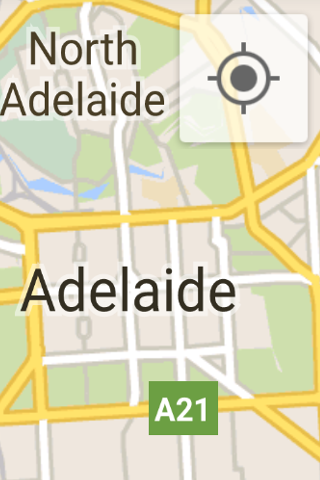
GoogleMap에 내장된 getUiSetting 을 이용하면 다음과 같은 위치표시 버튼을 맵에 표시할 수 있습니다. 옵션을 추가함으로써 Zoom control이나 Level picker도 표시하게 할 수 있습니다.

출처 : https://developers.google.com/maps/documentation/android-sdk/controls

출처 : https://developers.google.com/maps/documentation/android-sdk/controls

맵 상에 위치표시 버튼을 보여주게 하려면 onMapReady에서 map 객체를 획득한 후 다음 작업을 수행하면 됩니다. 위치권한을 사용해야 하는 작업인데 프래그먼트에서 권한을 획득하는 로직이 없으므로 Missing permissions 경고가 발생합니다. 하지만 권한은 액티비티에서 이미 취득했으므로 경고를 무시하기 위해 @SuppressLint("MissingPermission") 어노테이션을 붙여줍니다.

 1
 2
 3
 4
 5
 6
 7
 8
 9
10
11
+ @SuppressLint("MissingPermission")
override fun onMapReady(googleMap: GoogleMap) {
    map = googleMap

+    try {
+        map.isMyLocationEnabled = true
+        map.uiSettings.isMyLocationButtonEnabled = true
+    } catch (e: Exception) {
+        e.printStackTrace()
+    }
}

# FusedLocationProviderClient 이용하기

기본으로 제공된 버튼을 사용하지 않고 내 위치를 받아오는 기능을 직접 구현할 수도 있는데요, 그 경우엔 FusedLocationProviderClient를 사용하면 됩니다.

우선은 맵프래그먼트의 레이아웃에 현재 위치를 확인할 플로팅 버튼을 추가합니다.

1
2
3
4
5
6
7
8
<com.google.android.material.floatingactionbutton.FloatingActionButton
    android:id="@+id/btn_fab"
    android:layout_width="wrap_content"
    android:layout_height="wrap_content"
    android:layout_margin="20dp"
    android:src="@drawable/ic_baseline_location_searching_24"
    app:layout_constraintBottom_toBottomOf="parent"
    app:layout_constraintEnd_toEndOf="parent" /> 

fusedLocationProviderClient 전역변수를 만들고 onViewCreated에서 초기화합니다.

1
2
3
4
5
6
7
+ private lateinit var fusedLocationClient: FusedLocationProviderClient

override fun onViewCreated(view: View, savedInstanceState: Bundle?) {
    super.onViewCreated(view, savedInstanceState)
    ...
+    fusedLocationClient = LocationServices.getFusedLocationProviderClient(requireActivity())
}

그리고 플로팅 버튼을 클릭했을 때 fusedLocationProviderClientlastLocation으로 위치정보를 얻고 그걸 지도에 표시하면 됩니다.

1
2
3
4
5
6
7
8
9
binding.btnFab.setOnClickListener {
    fusedLocationClient.lastLocation.addOnSuccessListener { location : Location? ->
        if (location != null) {
            val mylocation = LatLng(location.latitude, location.longitude)
            val cameraUpdate = CameraUpdateFactory.newLatLngZoom(mylocation, 14f)
            map.animateCamera(cameraUpdate)
        }
    }
}

이 때 lastLocation다음과 같은 경우null이 될 수 있기 때문에 null 체크를 해 주어야 합니다.

  • Location is turned off in the device settings. The result could be null even if the last location was previously retrieved because disabling location also clears the cache.
  • The device never recorded its location, which could be the case of a new device or a device that has been restored to factory settings.
  • Google Play services on the device has restarted, and there is no active Fused Location Provider client that has requested location after the services restarted. To avoid this situation you can create a new client and request location updates yourself. For more information, see Receiving Location Updates.

# 생명주기 관리

프래그먼트의 생명주기에 따라 구글맵을 관리하기 위한 처리를 해 줍니다. 맵을 액티비티에서 SupportMapFragment로 구현할 경우에는 신경쓰지 않아도 되는 부분입니다.

 1
 2
 3
 4
 5
 6
 7
 8
 9
10
11
12
13
14
15
16
17
18
19
20
21
22
23
24
25
26
27
class MapFragment : Fragment(), OnMapReadyCallback {
    ...
    override fun onStart() {
        super.onStart()
        binding.mapView.onStart()
    }

    override fun onStop() {
        binding.mapView.onStop()
        super.onStop()
    }

    override fun onResume() {
        super.onResume()
        binding.mapView.onResume()
    }

    override fun onPause() {
        binding.mapView.onPause()
        super.onPause()
    }

    override fun onLowMemory() {
        super.onLowMemory()
        binding.mapView.onLowMemory()
    }
}

이렇게 해서 프래그먼트에서 구글맵을 구현하고 기본적인 동작을 수행하는 법에 대해 알아보았습니다.

Licensed under CC BY 4.0
Built with Hugo
Theme Stack designed by Jimmy